How to Braid Fine, Slippery Hair So It Stays Put

Fine, slippery hair usually needs three changes: less product, smaller controlled sections and consistent tension that feels secure without hurting. Start with dry or almost dry hair, add one lightweight grip product in a small amount and build a clean braid before gently widening it.
The most common mistake is trying to solve every problem with more spray or tighter pulling. Excess product can make fine strands heavy or stiff. Excess tension can make the style uncomfortable and may stress the hairline. A better method is to identify where the braid fails then adjust only that part.
Why Fine, Slippery Hair Drops a Braid
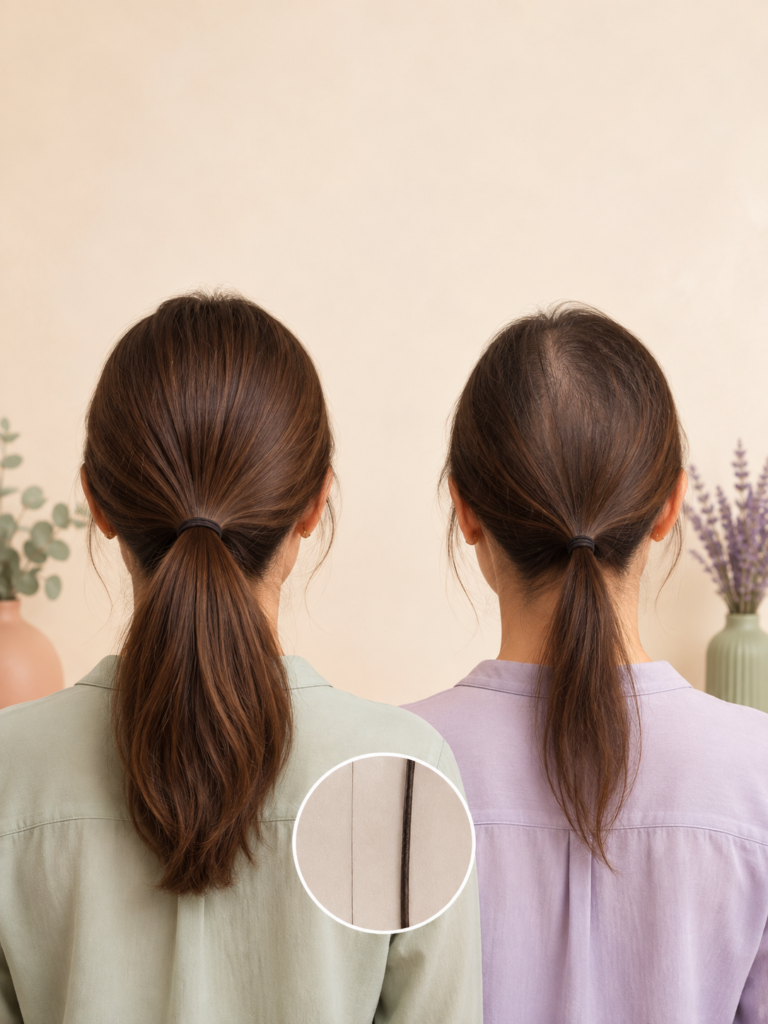
Fine hair refers mainly to the diameter of each strand. Low density refers to the number of hairs growing within an area. These measurements are separate, so a person can have fine strands and plenty of hair or thicker strands with lower density. Hair research measures diameter and density as distinct characteristics.
Femorias explains this distinction in more detail in its guide to the bixie haircut for fine hair. That article also explains why adding too much weight or product can make fine hair lose its shape.
A braid may fail for several different reasons:
- Loose roots: The first sections were too large or the hands moved away from the scalp.
- A loose middle: The section sizes changed as the braid continued.
- Escaping ends: The remaining hair became too short or smooth for the final stitches.
- A flat appearance: The strands are fine or the hair has lower density.
- A stiff, separated braid: Applying too much product before dividing the hair can make the braid stiff and separated.
The fix depends on the symptom. A braid that slips at the root needs a stronger starting structure. A braid that feels coated needs less product rather than more tension.
Choose the Lightest Preparation That Solves the Problem
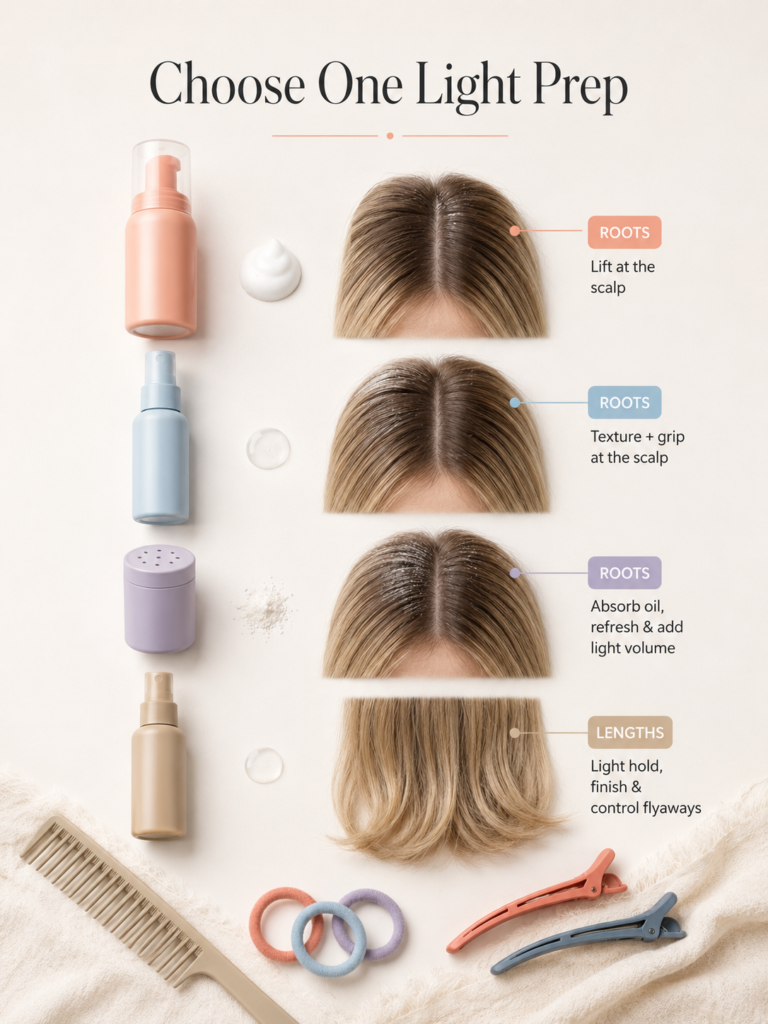
Do not layer mousse, dry shampoo, texture spray and hairspray automatically. Choose one starting product according to how the hair behaves.
| Hair condition | Start with | Where to apply | What to avoid |
|---|---|---|---|
| Freshly washed and very smooth | A small amount of light mousse or dry texture mist | Through the sections that will be braided | Oils, heavy creams and several styling layers |
| Roots feel clean but the lengths slip | A light texture mist | Mid lengths and ends | Saturating the root area |
| Roots feel oily | A modest amount of dry shampoo | Root area only, followed by gentle distribution | Repeated heavy spraying through dry ends |
| Hair becomes stiff easily | No prep product or a very light mist | Only where the braid first loosens | Strong hold product before sectioning |
| Short pieces escape | A tiny amount of flexible styling cream | On the specific short pieces | Coating the complete braid |
| Finished braid develops flyaways | Light finishing spray | Over the completed style from a sensible distance | Brushing after strong hold spray has dried |
Product performance varies by formula and hair condition. Begin with less than expected. It is easier to add a little more than to remove a heavy coating without washing.
Detangle before applying a setting product. Once a firm spray dries, dragging a comb through the hair can increase friction and breakage. The American Academy of Dermatology advises reducing rough handling and excessive use of products designed for long lasting hold.
For straight or gently wavy fine hair, work on dry or almost dry strands. The AAD notes that wet hair breaks more easily when brushed or combed for most hair types. Tightly curled and textured hair can have different detangling needs, so follow the method that causes the least pulling for the individual texture.
How to Braid Fine, Slippery Hair Step by Step
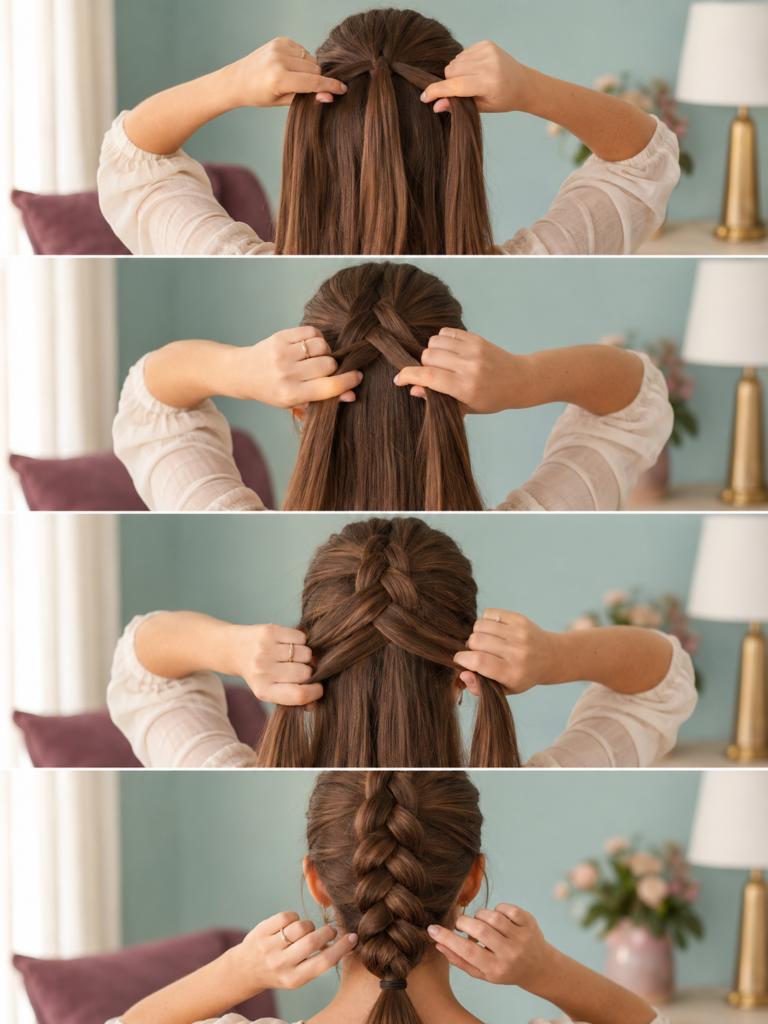
1. Detangle before creating sections
Remove knots from the ends first then move upward. The braid will be more even when each added section can be separated without tugging.
2. Apply one preparation product sparingly
Use the preparation table above. Distribute the product then wait briefly before dividing the hair. The strands should feel more manageable but should still move freely between the fingers.
3. Build a stable starting point
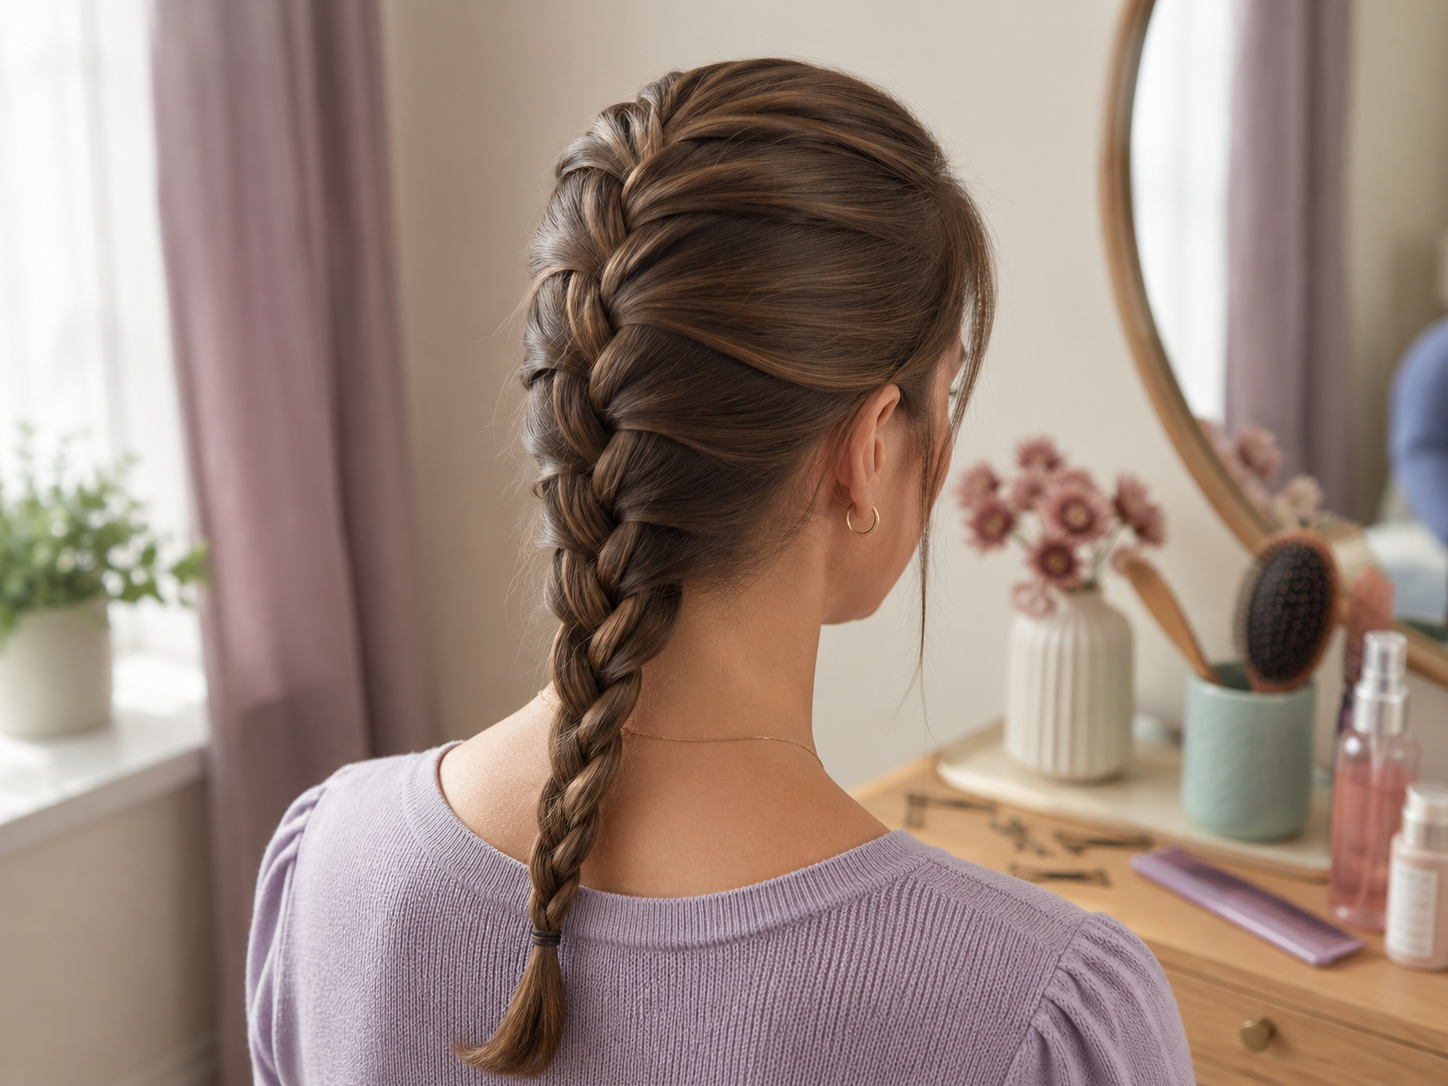
For a French or Dutch braid, begin with three small sections at the crown. For a simple low braid, gather the hair at the nape with a soft elastic before braiding the length. The base elastic is useful when smooth hair keeps falling away before the first complete stitch.
4. Keep the working area close to the head
Move the hands close to the place where the next stitch is formed. When the hands drift far from the scalp, the newly added section has room to loosen before it is crossed.
Close hand placement creates control without requiring painful pulling.
5. Add similar amounts of hair
Uneven additions create a braid that is tight in one section and loose in another. Use a fingertip or comb tail to collect sections of a similar width.
The sections do not need to be mathematically identical. They only need to remain consistent enough that the braid does not suddenly change shape.
6. Maintain comfortable, steady tension
Hold the completed stitches firmly enough that they do not collapse while the next section is added. Do not pull harder each time the braid feels slippery. Instead, make the next section smaller and move the hands closer to the braid.
Stop and loosen the style if it causes pain, stinging or a headache.
7. Secure the end before adding volume
Finish the braid with a small elastic suited to the amount of hair. The elastic should hold the end without requiring so many wraps that it pulls or snaps strands.
Do not widen the braid while the end is unsecured. One loose stitch can travel upward and undo several sections.
8. Widen from the bottom upward
Hold the elastic with one hand. With the other hand, pull only the outer edge of each braid loop by a few millimetres. Move upward gradually.
Do not pull the complete section out at once. Small adjustments produce a fuller shape while leaving the center of the braid intact.
Choose a Braid Structure That Matches the Failure Point
A style anchored to the scalp is usually easier to control than a loose braid beginning below the shoulders.
| Main problem | More suitable starting structure | Reason |
|---|---|---|
| Roots slip first | French braid | New hair is incorporated close to the scalp |
| Braid looks narrow | Dutch braid | The raised shape makes the woven pattern more visible |
| Beginner struggles with the first stitch | Low ponytail braid | The base elastic stabilizes all the hair |
| Only front sections need control | Half up braid | Less hair needs to be managed |
| Ends separate quickly | Three strand braid | Larger sections are easier to secure |
| Small layers escape everywhere | Two smaller braids | Each braid manages a narrower area |
The easy braids for busy mornings guide provides style ideas once the preparation method feels reliable. Its French braid, Dutch braid and braided ponytail are the most relevant starting points.
A fishtail can look attractive on fine hair but its small pieces may be difficult to control when the hair is extremely smooth. Build it from a secured low ponytail before attempting a loose version.
Readers with longer hair can also compare how different styles behave in Femorias’ long hairstyle trial, which includes Dutch braids, a fishtail and a braided ponytail.
Fine Hair Braid Troubleshooting Matrix
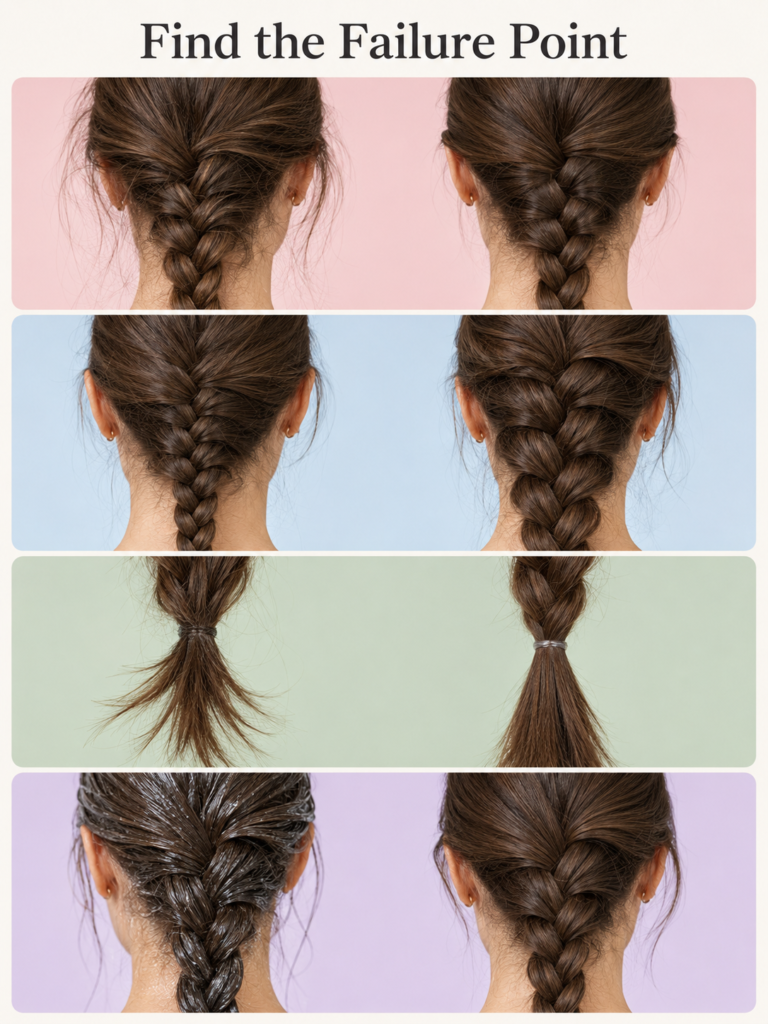
| What you see | Likely cause | First correction | Avoid |
|---|---|---|---|
| The crown loosens immediately | Starting sections are too large or hands are too far from the scalp | Restart with smaller sections and closer hand placement | Pulling sharply at the hairline |
| The middle becomes loose | Section size or hand tension changed | Pause and tighten only the most recent stitch | Continuing and hoping the end elastic will fix it |
| The braid twists sideways | More hair is being added from one side | Compare each new section before crossing | Compensating with a large section on the next pass |
| The braid looks very narrow | Fine strands or lower density create less visible bulk | Secure first then widen the outer edges gradually | Pulling from the center of each stitch |
| The ends unravel | Too little length remains or the end elastic is too large | Finish the braid earlier and use a smaller suitable elastic | Braiding to the last few fragile strands |
| Short pieces escape near the face | Face framing layers are shorter than the braid path | Leave them intentionally soft or secure them with a small pin | Forcing them into a painfully tight hairline section |
| Hair feels heavy and separates into coated pieces | Too much product | Brush out gently before firm hold product dries or restart with less | Adding dry shampoo over heavy cream |
| The braid becomes fuzzy during widening | Too much hair is pulled from each loop | Use fingertip sized adjustments | Pulling the complete loop outward |
| Pins slide out | They are placed parallel to the loose hair | Insert the pin across the direction of movement | Adding many pins in the same direction |
| The scalp hurts | Tension is excessive | Remove or loosen the style promptly | Treating pain as proof of good hold |
Face framing pieces that continually escape may be part of the haircut rather than a technique failure. The Femorias guide to medium hairstyles with face framing layers helps identify where shorter front sections begin.
Make the Braid Look Fuller Without Pulling Harder
Create fullness after the structure is complete:
- Secure the end.
- Hold the elastic firmly.
- Begin at the bottom of the braid.
- Pull only the outside edge of one loop.
- Match the adjustment on the opposite side.
- Move upward one stitch at a time.
- Stop before the center becomes loose.
For lower density hair, widening should remain modest. An extremely expanded braid may reveal larger spaces between sections and make the scalp more noticeable.
A side braid or braid beginning from a small ponytail can also create a stronger focal point without pretending the hair has a different density.
Keep the Style Comfortable
Secure does not mean painful. Repeated pulling from tight braids, ponytails and updos can contribute to traction alopecia. The American Academy of Dermatology advises loosening styles that pull and changing a hairstyle when it causes pain, stinging, scalp crusting or visible tension.
The British Association of Dermatologists similarly describes traction alopecia as hair loss caused by repeated pulling. Long term tension can eventually produce permanent loss in affected areas.
Remove or loosen a braid when:
- The scalp hurts
- The hairline feels sharply pulled
- A headache develops after styling
- The scalp appears raised between braid sections
- Broken hairs are increasing around the hairline
New, spreading or unexplained hair thinning should be assessed by a qualified medical professional rather than treated as a styling problem.
A Five Minute Fine Hair Braid Routine
Use this checklist once the basic braid pattern is familiar:
- Detangle dry or almost dry hair.
- Apply one light preparation product.
- Create three small starting sections.
- Keep the hands close to the working stitch.
- Add similar amounts of hair.
- Use steady, comfortable tension.
- Secure the end.
- Widen the braid from the bottom upward.
- Finish only the visible flyaways.
Save the checklist as a phone note or printable card near the styling area.
Frequently Asked Questions
Should fine hair be freshly washed before braiding?
It can be, but freshly conditioned hair may feel smoother and require a small amount of lightweight preparation. There is no requirement to wait for a particular wash day. Use the hair’s actual condition rather than a fixed rule.
Is dry shampoo or texture spray better for slippery hair?
Dry shampoo is most useful when oil at the roots is contributing to movement. Texture spray is more suitable when clean lengths lack grip. Neither should be applied heavily by default.
Why does my braid look thinner after I pull it wider?
Too much of each loop may have been pulled away from the center. Hold the end securely and adjust only the outer few millimetres of each stitch. Work in smaller movements.
Can fine hair be braided every day?
A comfortable loose or moderately controlled braid may be part of a regular routine but the tension point should be changed. Avoid repeatedly pulling the same hairline area and remove any style that causes pain. Dermatologists recommend varying hairstyles and avoiding frequent tight pulling.
The Practical Answer
The most reliable way to braid fine, slippery hair is to build control before adding fullness. Use one light preparation product, small even sections and comfortable tension. Secure the complete braid first then widen it carefully. When something slips, correct the specific failure point instead of pulling the entire style tighter.